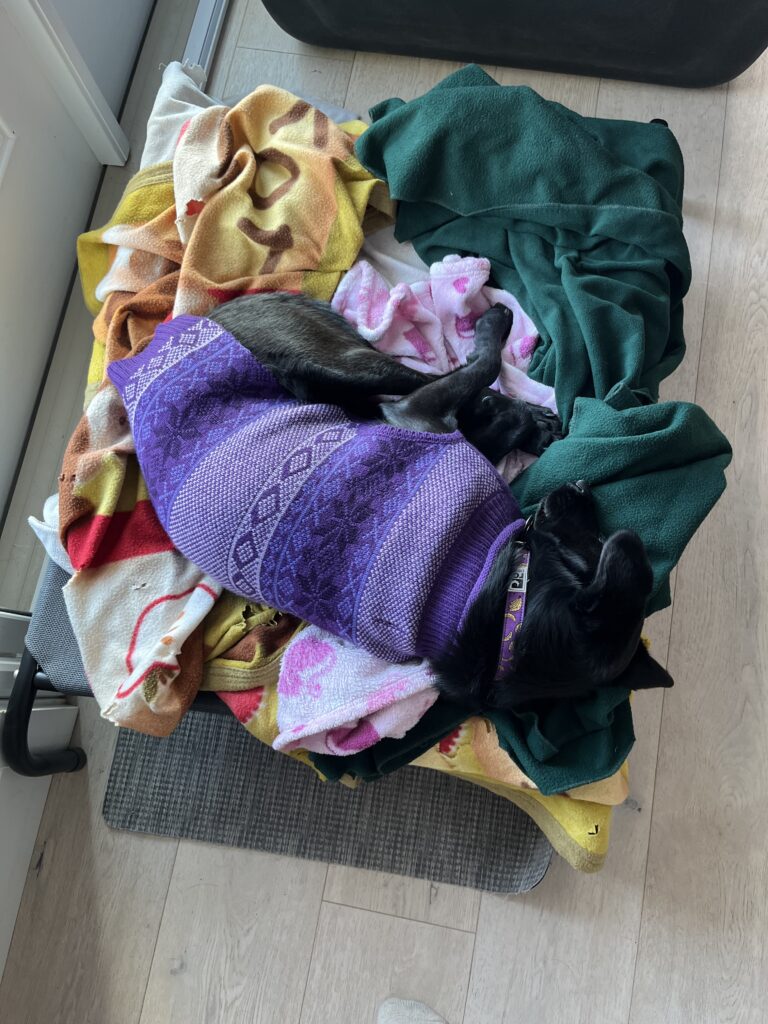
All in all, I have really enjoyed doing my free inquiry. Crocheting is something that I have been wanting to get into for the past few years, but I always found myself pushing back on it due to how busy I was. While I was not able to accomplish my goal of finishing crocheting a sweater for my dog, I learned how to do several different stitches, am well on my way to completing the sweater, crocheted a toque, and started to crochet a blanket. I feel very happy with the accomplishments that I have been able to make during this inquiry! I think I will be able to finish the sweater for my dog soon, although she may not be needing it until next winter at this point. I hope to keep working on the blanket as well. I have found crocheting to be a very relaxing activity, and have found myself working on it to unwind or as something to do with my hands while I watch TV. I am very grateful that this free inquiry gave me the push to allot time in my weeks to work on building this skill that I have always wanted to acquire. I enjoyed looking for accessible tutorials to help me learn to crochet, and found that I had higher standards when looking for these videos as I wanted to find videos that were accessible. Since I was not able to finish crocheting the sweater for my dog, I have attached a photo of her sleeping in her other sweater.
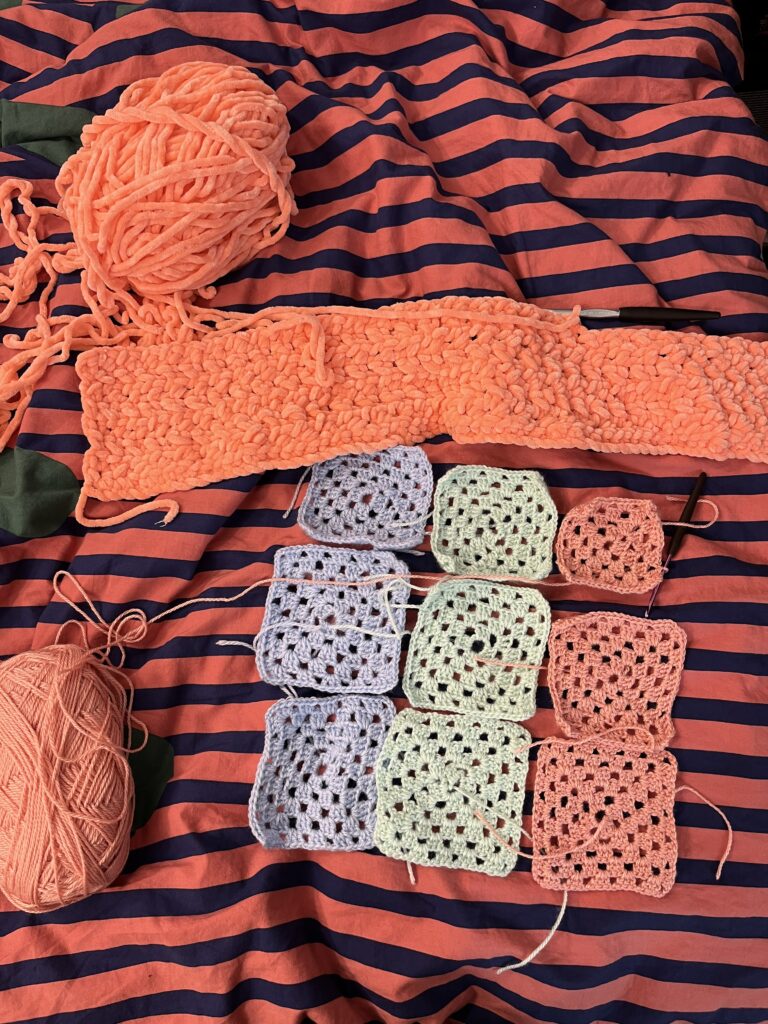
In the past week, I mostly worked on making more granny squares. I did not have too much time since I was working on catching up on assignments and work from when I was sick, but I am now up to 9 granny squares! It is hard to tell exactly how many I will need to make the sweater, but I think I will need quite a few more. I also started to make a small blanket with the chunky yarn and 9.0mm crochet hook. I lost track of how many I chained to start the blanket, but I then learned how to do a half double crochet in a cross stitch pattern which I used to make the rest of the rows. I was able to get about 15 rows done, which is a good start! This is a bit of a side project and will likely take quite a while to make a full length blanket. I used a video to learn how to make the blanket which was very accessible. It had chapters marked for each part of the process and had subtitles, making it easy to follow even without sound. I’m hoping to have more time to complete the granny squares and make the sweater very soon!
This semester, we have had the pleasure of taking EDCI 415, Pedagogy for Mathematics Education, with Jeannie DeBoice. Jeannie opened our eyes to the world of manipulatives, and how powerful they are in the math classroom. These kinds of manipulatives were mostly available in our elementary and middle school classrooms growing up, but what was not available were online versions of these same manipulatives. We know and have seen the power of manipulatives when working through and exploring math problems, but are online math tools, which may me more accessible, as effective? This led us to our guiding question for this inquiry: are online math resources effective tools in the classroom?
In the video below, I introduce our topic and the online math tool we centered our inquiry on.
The virtual manipulatives that I highlight in the video above, Didax, provides a platform for both teachers and students to access manipulatives like base ten blocks, fraction strips, and even dice. Can this online resource act as an effective replacement, or companion, to physical manipulatives? What are the drawbacks, if any? How can these be used in the most effective manner? We will address these questions below as we explore this digital tool.
The Relationship of Online Manipulatives to Teaching and Learning (Emily)
As teachers, we are shown many resources without knowing if they are effective additions to our classroom. Are we using resources for the sake of using them, or for our students’s learning? For UDL- It is enhancing all my students’ learning?
It is important for online resources to be relevant to your teaching style and relevant to the context (ie canadian, matches the resources you have been working with). Online math manipulatives help foster a universal learning design in the classroom as read in a research paper I found. Some students who need extra support with math in the class can use the digital manipulatives with a partner to show different ways they can solve a problem- teacher models the use of online manipulatives in front of class to make the use of virtual manipulatives more engaging. Without diving too deep into the pros and cons which is discussed later the article also suggests how “students with disabilities benefit from manipulatives to support their acquisition, fluency, maintenance, and generalization of mathematical skills” (Bouck et al. 2020).
What are the Pros, Cons, and Risks?
As with any piece of technology, there are many different pros, cons, and risks of using online math manipulatives such as Didax. As teachers, it is important to weigh these pros, cons, and risks in order to see if a new online tool would be beneficial to the classroom.
Online math manipulatives allow all teachers and students to have access to a plethora of manipulatives that they may not be able to get physical copies of in their classroom. Didax has the option to use Unifix blocks, geometric blocks, fraction strips, and many more. This site allows students to have the chance to access and use this wide range of materials at home as well, where they likely would not have access to the physical manipulatives. Online math manipulatives can also be used to make math engaging and interactive, giving students a way to visualize the processes behind the mathematics. These tools also offer a way to scaffold learning to make it more easily understandable for students. Researchers have also found that while some people may fear that virtual manipulatives do not provide the same benefits as physical ones, they are equally effective when used to teach mathematical concepts.
While there are many pros to these math manipulatives, there are some possible cons to using them in the classroom. While virtual manipulatives are seen as being equally effective for teaching mathematical concepts, there are some students who need physical manipulatives to learn. These can also create a lack of personal interaction, with students working individually on their devices. As with any form of technology, you can also experience technical issues that can use up some class time. These manipulatives also have limited teacher control, meaning that students could be using them however they want or getting distracted.
Virtual math manipulatives are generally safe, with sites like Didax not containing advertisements or anything to redirect the students, there are some other risks associated with virtual math manipulatives. One possible risk is that students may begin to rely on memorization and using the manipulatives in one specific way. This could prevent students from being flexible thinkers in math.
Strategies, Best Practices, and Tips
Online math resources can be very educational and helpful in the classroom. However, how can we, as teachers, filter out good resources to share in the classroom? When searching for online math resources, it can be helpful to ask yourself questions such as: Does this resource enhance student learning or is it just a fun game? Does this resource connect to the curriculum? Is this resource accessible for all students? Will this resource protect myself and my students’ privacy, or does it ask for personal information? For example, Cool Math Games has good educational content, however, not all of the games require math skills and can be easily played by guessing the answer. If you don’t purchase the premium version of Cool Math Games, the site will overflow with distracting and unuseful ads. Didax Math Manipulatives can be accessed freely without any ads, and encourages students to inquire about math content using visuals.
Finding good online math resources can be very useful in the classroom as it can help students familiarize themselves with technology and work independently. As a teacher, it is good practice to introduce online math resources while continuing to use physical manipulatives as all students have different methods of understanding and visualizing math content. It is also important to ensure that the teacher is observing and assessing student use of online resources. This is a great opportunity to understand different student needs and strengths and should not just be a time where students grab a Chromebook while the teacher uses this as a break or prep time.
After looking at a few different online math resources, I’ve come up with a short list of tips that can help you choose the most useful resources for your students.
High quality, low quantity
A good math resource has a small list games or manipulatives that strengthen math skills
Free from ads or possible viruses
Ensure the site is Canadian or at least North American
Connection to the curriculum
Low floor, high ceiling
No account creation needed
Conclusion
Overall, this inquiry allowed us to explore the effectiveness of online math resources with a particular focus on Didax. We considered the relationship of these tools to teachers and learners, as well as the advantages, disadvantages, and risks. While online manipulatives may not allow students to interact with the materials in the same way as they would if they were in their hands, when used following our suggestions, they are a valuable addition to the classroom.
References Bouck, E. C., Mathews, L. A., & Peltier, C. (2020). Virtual Manipulatives: A Tool to Support Access and Achievement With Middle School Students With Disabilities. Journal of Special Education Technology, 35(1), 51–59. https://doi-org.ezproxy.library.uvic.ca/10.1177/0162643419882422
Computational thinking can be a great way to help learners become better problem solvers. Through computational thinking, students are required to look at problems as a series of tasks, turning the problem from one big thing into a series of smaller and more manageable steps. This is the algorithm they are creating through decomposition. Students using computational thinking can also become better at pattern recognition; understanding that new problems may be related to problems they have already solved. These skills can then be applied to a variety of problems, making students better problem solvers. It can also help students feel more prepared to tackle problems, especially once they are able to use decomposition and pattern recognition. By using these, students may feel less stressed about big problems, looking at them properly as a series of smaller problems rather than one big issue.
Photo by olia danilevich: https://www.pexels.com/photo/man-sitting-in-front-of-three-computers-4974915/
Non-Math Related Opportunities for Coding
As I mentioned, computational thinking can be applied to problem-solving as a whole, making it easily applicable to other subjects, from humanities to sciences. Many problems contain steps, making computational thinking a great resource aide. Coding in schools is generally thought of with regards to mathematics, but in reality it could be used for a variety of subjects. Coding can be used for humanities, creating a story and using coding to animate it. Programs such as Scratch allow learners to create simple animations, which can be great for storytelling. Students can create their character, giving commands that cause them to move along with the story. Voice over can also be added using this program, allowing students to narrate their story if their grade level allows. You can also use this for science, mimicking labs. Students can use coding to run a program that shows what they did for their labs, giving an almost alternative to the usual written lab reports. While coding does generally involve math, it does not have to be the main focus, allowing coding to be presented to children in a way that has them focus on other subjects without even realizing that they are doing math!
Photo by hitesh choudhary: https://www.pexels.com/photo/man-in-grey-sweater-holding-yellow-sticky-note-879109/
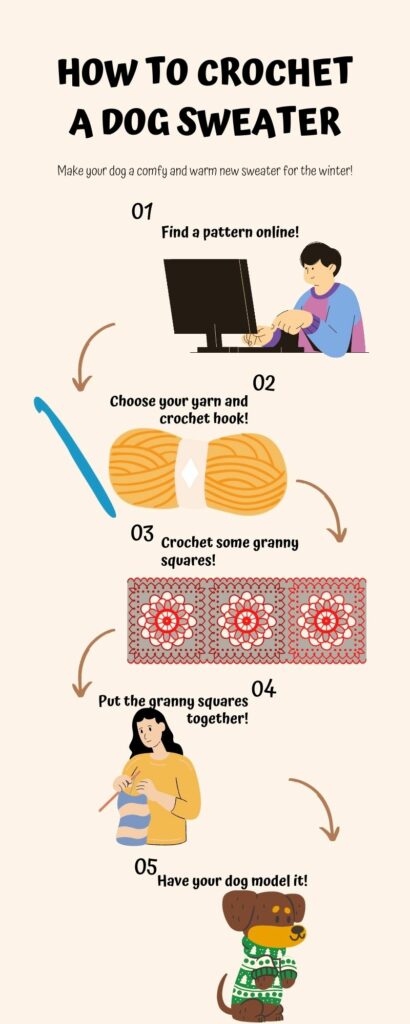
I was sick for the past week, which gave me a lot of time to practice my crocheting. I was finally able to figure out how to make granny squares, and made a couple. I used my 4.0mm crochet hook and thin yarn, creating my slip knot and getting started. I realized that it may be easier to create the magic circle if I started with a longer chain, so rather than chaining 4 I chained 8. After this, I slipped the hook through my first chain and pulled the yarn through, creating my circle! I was then able to realize that each side of my square should be made of 3 double crochets. To start this first round, I chained three, then did two double crochets. This created the first side of my square. To get to the next side of my square, I chained 3 to create the corner. Once I had my corner, I did three double crochets to create the next side. I then repeated my corner and created the last two sides for this round. My first granny square was not perfect, as I got lost in the rounds and was not able to finish each round before starting the next one, creating a bit of a spiral. For my next granny square, however, I realized I needed to end each round before beginning the next. To do this, I would slip the hook through the first loop on the first side of the round after finishing the last side. Then, I would loop the yarn onto the hook and pull it through. I continued this, making about 4 rounds for the granny square. Once I reached the end, I would end the round as usual before cutting the yarn, chaining one more and pulling the yarn through to close the square. I repeated these steps for each of my granny squares. This progress was great for me, as I am now one skill closer to being able to complete the dog sweater I am working towards!
Creative commons licensed materials can help teachers while creating instructional materials. These materials can range from videos to audios to photos and many more. By using these free-to-use resources, teachers can create a wide variety of materials to aid their teaching. Creative commons licensed materials are free to use, serving as a great jumping off point for creating educational materials. Using these could be a bit difficult at times as you do need to take the time to find appropriate materials that fully suit your needs, which may be hard to find depending on what kind of materials you need. In some cases, this may make it easier to create new materials, but these creative commons licensed materials can still be used as inspiration!
There are many ways that we, as teachers, can help students learn to manage their digital footprint. Emphasizing the importance of monitoring online activity is a great place to start. Information posted on the internet is there forever, so it is important to show this. There are many different archival websites that preserve even personal social media accounts and can be used to show what they looked like at various times in the past. This goes to show how important it is to monitor posts before they are shared, not just reflect on them after. Though it is important to teach about safety with regards to digital footprints, you also want to ensure that you aren’t just making the students fear using digital technologies. These technologies can be very beneficial both socially and educationally when use correctly and safely. The main emphasis should be on privacy when reviewing different technologies, ensuring that there are ways to manage the student’s digital footprint and any possible interactions with other users of the technology.
Video Creation as a Learning Resource in Middle Years
Video creation can be used in the classroom as a great learning resource as it provides students with a creative outlet to present information. When thinking of video creation, I think that many people first think about how kids like to make silly videos for fun, not necessarily how these videos can help a student in an educational setting. Students can use video creation for almost any subject by being given assignments that involve making educational or informative videos. These can be created in a variety of ways, from students just recording a virtual presentation to students making documentary type videos to present information. This allows variety for students, allowing them to operate in whatever mode they feel comfortable. Students can also get very creative with video creation, incorporating a variety of art forms into its creation. This also gives students more options for presenting information, making this a versatile tool. It can also help students who may feel uncomfortable with presenting in front of the class, as they can just present to a video camera and edit it which may help them feel more secure in the information they are presenting and give them a safer environment to present their information.
Example of a Creative Commons Licensed Video
Video by cottonbro studio: https://www.pexels.com/video/a-woman-s-hand-full-of-paint-stain-3796274/ Audio by Jazz One Beats from CC Trax
This week, I was able to make much more progress in my crocheting. As I mentioned I was going to do in my last post, I went to get bigger yarn and a bigger crochet hook. I landed on a 9.0mm hook and bulky yarn. Once I had purchased these materials, I decided to try and crochet something a bit easier than a granny square. I looked up a tutorial about how to crochet a toque and I got to work! I found the tutorial below on Youtube. The video was accessible with the subtitles available, however it would have been nice if the different steps had been marked as chapters on the video to make it easy to review past steps or jump to future steps. The pattern used in the tutorial was also linked in the caption of the video, allowing me to both read about the pattern and follow the steps laid out in the video.
Crochet Tutorial by Jonna Martinez on Youtube
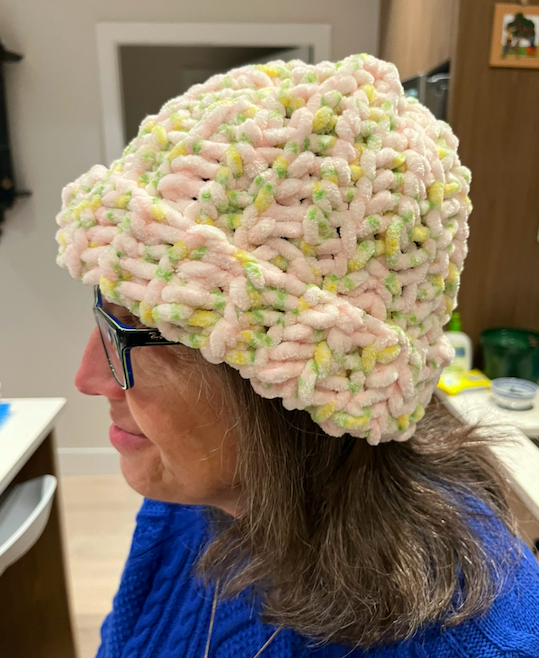
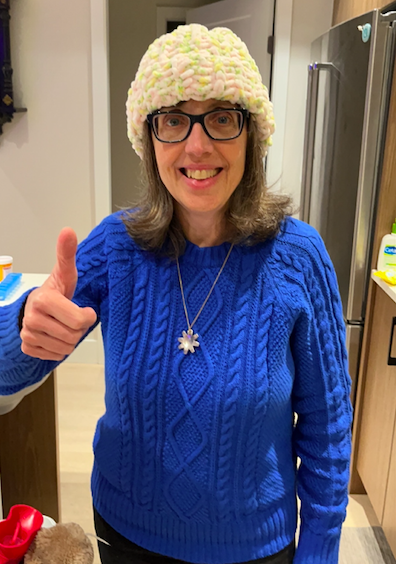
Similar to the granny square, the first step for this was creating a slipknot. After this, I had to chain 27. Then I learned a new stitch, the half double crochet. This involved looping the string on the hook and going back down the chain to insert the hook in one of the previous chains. I then had to hook the string, pulling it through the chain before hooking the string again to pull it back through the three loops on my hook. I was able to catch on to this pretty quickly. I then had to continue doing this up and down the chain until I had created about 25 rows. Once I had these, I was able to begin putting my toque together! I laid the material flat, folded it in half, and crocheted along one of the edges to create something that looked like a neck gaiter. After this, I had to use the string to loosely stitch through ribbed portions of the hat before pulling the string to bunch together the top. After this, I did some additional crocheting to ensure that the top of the hat stayed closed and to loop in the end of the yarn so that it would not hang out. After this, I flipped the toque inside out and it was finished! Since this was my first try, the top of the toque was a bit messy, and the pattern of the toque was not completely even. Overall, this process made me feel much more confident in my crocheting. I gave the toque to my mother, and I was happy to see that it seemed to be the right size! Next week I think that I will go back to trying to create a granny square in order to try and work towards my original goal of crocheting my dog a sweater.
Attached below are the photos of my mother with the toque I crocheted for her.
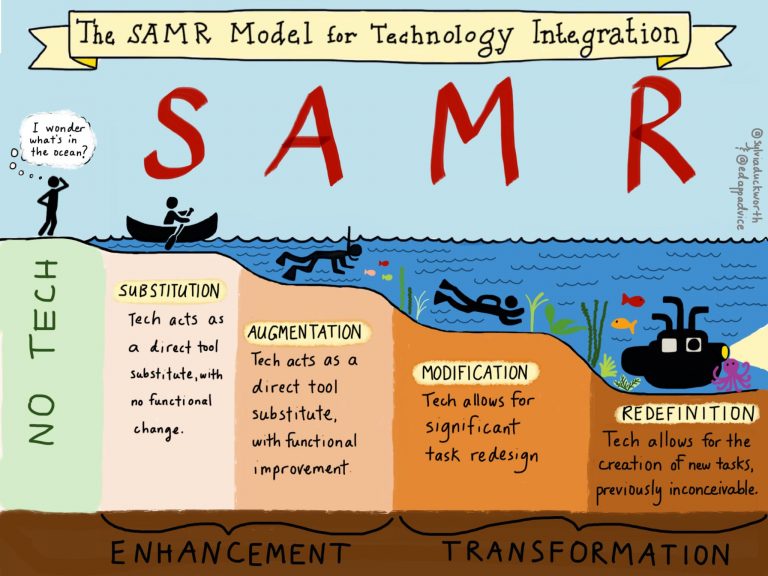
The SAMR theory of technology adoption is a tool that is used to help teachers evaluate how they are using technology in their classroom. Is technology being used to enhance or transform the learning in the classroom? This model can be seen as a ladder, with a dotted line showing where the use of technology shifts from being enhancement to transformation. SAMR begins with the use of technology, with the first two parts being enhancement and the second two being transformation. First comes the S, which stands for substitution. This is when the technology is being used as a direct substitute for a learning tool without changing the function of the tool. Next is the A, standing for augmentation. With augmentation, the technology is still being used as a substitute for a learning tool, but this substitution also improves the function, therefore augmenting the tool. Substitution and augmentation are both seen as enhancements, not transformations. After augmentation comes the M, which stands for modification. This is when technology is used to help redesign a task. The final step is the R, standing for redefinition. This is when technology is used to create completely new tasks that would not be possible without the use of technology. Modification and redefinition are seen as transformation tasks as they can completely change activities in education.
This model can help you evaluate technologies that you are thinking of using in your classroom because it can help you critically reflect on how the technologies can help learners. Do you want to completely redefine every task, or are you just looking for substitution for some? By looking at how the technology is being used, you can ensure that you are keeping a good balance between enhancement and transformation. This will help you create a learning environment that works for everyone, giving the space for adaptability. This can also help with accessibility, as it can help teachers reflect on possible accessibility pros and cons that can come with various technologies.
SAMR model, illustrated by Sylvia Duckworth
Sketchnoting in Intermediate and Middle Grades
In any classroom, it is usually very common to see at least a few students doodling in their notebook while listening to a lecture or taking notes. Since this type of behaviour is so common, it is good to reflect on how it can be used to help students with comprehension! This is where sketchnoting can play a positive role in the classroom. Sketchnoting allows students to combine their notes with drawings in a way that helps them understand the information much more clearly. These sketchnotes do not include word-for-word transcriptions of the information being presented to students, but rather use summary note-taking. Pairing this summary note-taking can help students grasp the information as they need to understand it enough to be able to provide a general idea of the meaning, not just memorize and regurgitate specific details onto the page. The doodling that comes with creating a sketchnote can also help engage students who tend to lean more into the arts and creative practices, as they are able to illustrate the information in a way that works and is clear to them. This can help some students more than just having written notes. In intermediate and middle grades, this could be used a lot. These students tend to be taking classes where note taking is required, and from what I have seen this also generally tends to be where I see a lot of children doodling in class. Giving classes an engaging note-taking task, such as sketchnoting, can increase engagement in the classroom and help make it more accessible for students who may have difficulty with written note-taking. One barrier that may need to be reviewed in the classroom is students spending too much time trying to perfect their drawings. This could make this task stressful for some, as they may want their doodles to be perfect. It would be important to emphasize that these notes are just for themselves, and do not need to be perfect! If the task is proving too stressful, it may not work in that classroom. Similarly, some students may feel too self-conscious to draw on their sketchnotes, worrying that their drawings won’t be good enough.
I think that technology could be used as well to help with this problem, with programs like Canva being used to create infographics. These infographics can work as digital sketchnotes, allowing students to search photos to pair with their summary notes rather than making them draw the pictures themselves. Providing this option to students could also help make the activity more accessible, as not everyone may be able to sketchnotes. Especially with intermediate and middle grades, I think that having the online option could help alleviate some stress from the assignment, allowing students who may feel self-conscious or stressed about their doodles to have another way to express their knowledge.
Over the course of this week, I began crocheting. It proved to be much more difficult than I anticipated. Following a tutorial, I learned how to make a slip knot to begin my crocheting. I was able to create a chain, and became accustomed to the process of pulling the yarn through the small loops. It all seemed to go a bit downhill, however, when it came to creating the centre of the granny square. To create a granny square, you must pull the crochet hook through your first chain, hooking the yarn and pulling it through both the loop and first chain. This is a double crochet. I was able to do this and create a circle with an empty center, however, I then struggled trying to create square sides. I was able to create the chain, but was not able to switch directions in order to create all the different sides. I think that this has to do with the size of the crochet hook and yarn, as I went for thinner yarn and a smaller hook. Next week I will be going to get a bigger hook and yarn, as some feedback from my peers suggested that this may help the process become easier for me. I may also have to shift my end goal to a different project if the granny squares prove to be too challenging for me. One suggestion provided to me was creating a toque or scarf, which may be easier as it would not require the same techniques that granny squares require. I think for now I want to give another try at creating granny squares using bigger yarn and a bigger hook.
I used the video attached below to supplement the tutorials I got from my friends. The video seemed to be quite accessible, with time stamps on all the different parts of the tutorial and subtitles available. Everything was very clearly shown while it was talked about to allow for a visual model. I found the video quite helpful when seeking clarity on parts that I was confused about in the tutorials from my friends.
One digital accessibility practice that I had not previously considered is the colour of a webpage and font. Despite having my own issues reading webpages sometimes due to the colours on the page, I had never considered how this could be seen as a barrier with regards to accessibility. This seems to be one of the toughest practices to use for me as everyone’s vision is different, and it may be tough to find a colour scheme that works for everyone. Using a basic colour scheme, with a white background and black text, seems like it would be the most universally accessible, but even it may serve as a barrier for some.
Why aren’t digital accessibility practices more common?
Until a couple years ago, I do not remember seeing any digital accessibility practices being used. In school we would watch movies without subtitles or any sort of captioning, and things like alt-text on photos seemed to be non-existent. In recent years, I think that I have seen an increase in these practices. Most people I know, including myself, seem to use subtitles all the time. This accessibility tool has become the norm for me, leaving me more surprised to see a video without subtitles. I think that apps like TikTok have actually been able to help with spreading awareness of this as an accessibility tool, with the app adding automatic subtitles to videos and making it easy for users to add their own subtitles as well. I have also seen alt-text becoming more and more common, especially on Twitter. Many accounts I follow seem to be adding alt-text when including photos in their posts, allowing those who are visually impaired to have access to these tweets. I have unfortunately not seen alt-text used commonly across other social media platforms and websites however.
I think that one of the main barriers preventing these digital accessibility practices from being more common is people being unaware of the need for them. People who may not need these tools may not be aware that others do, leaving them in the dark when it comes to creating accessible content. I think that these accessibility tools should be taught in schools when discussing technology, presenting them early on to help spread awareness. This can help make them the norm in digital spaces, rather than something that is seen as extra. These digital accessibility practices were not taught to me when I was being taught about technology, and I did not learn about them until seeing them discussed on digital platforms and social media. I imagine this is the case for many people, but some may never see it discussed on highly curated digital spaces if they are not often viewing content relating to accessibility.